Octavarium64 (talk | contribs) m (I don't know how that happened... ;D) |
Mira Laime (talk | contribs) m (vandalismspam) |
||
| (32 intermediate revisions by 14 users not shown) | |||
| Line 1: | Line 1: | ||
| − | {{Infobox Level |
+ | {{Infobox Level New |
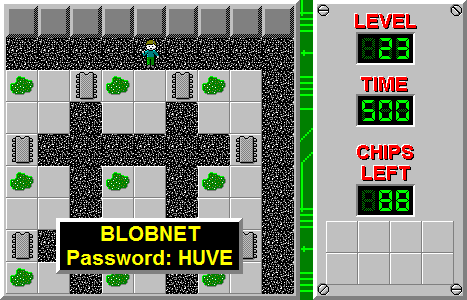
|name = BLOBNET |
|name = BLOBNET |
||
|image = [[Image:Level 23.png|300px]] |
|image = [[Image:Level 23.png|300px]] |
||
| − | |levelset = [[Chip's Challenge |
+ | |levelset = [[Chip's Challenge 1]] |
|level = 23 |
|level = 23 |
||
|password = HUVE |
|password = HUVE |
||
| Line 9: | Line 9: | ||
|chips available = 88 |
|chips available = 88 |
||
|time = 500 |
|time = 500 |
||
| − | |bold = |
+ | |bold ms = 436 (the [[Melinda time]] is calculated to be 444) |
| − | | |
+ | |bold lynx = 435 |
| + | |difficulty ms = 3 |
||
| + | |bold difficulty ms = 5 |
||
| + | |bold complexity ms = 2 |
||
| + | |||
| + | |difficulty lynx = 3 |
||
| + | |bold difficulty lynx = 5 |
||
| + | |bold complexity lynx = 2 |
||
}} |
}} |
||
| − | '''Blobnet''' is the 23rd level in [[Chip's Challenge |
+ | '''Blobnet''' is the 23rd level in [[Chip's Challenge 1]], and is on any serious Chipster's list of ''Most Hated Levels of All Time''. The 80 [[blob]]s bouncing around randomly within structured squares to collect 88 [[computer chip]]s among thin tunnels has led to one of the most wrenching, mindless, strategic (or lack of it), and generally outrageous [[bold time]] struggles in Chip's Challenge history. Though proper strategy will solve the level easily as long as one can keep a cool head, Blobnet is easily lost, many times over, by impatience or gross errors that would not occur in any other level. |
| + | The basic route can be constructed by altering the [[AVI]] route to avoid all floor spaces except the chips and eventually the exit. The next step is logic. |
||
| − | The basic route can be constructed by studying the route in the video, and simply not treading on the floor except when picking up a chip, or going to the exit, eventually. Eventually, start to take some of the chances at the beginning (it's more annoying to lose after 60 seconds than 6!), and then calculate coolly: blobs move at half your speed, randomly, but cannot speed up at all. This means, if all blobs are two spaces or more away from where you're about to step, you will be safe; there's no harm in stepping there, as long as it will still be on your intended route, and if the blob moves in the right direction, you can instantly pause the game, and then move in the new direction, gaining a bit of time. Also, don't be afraid to wait one move in order to balance the blobs out with your moves. |
||
| + | == Strategy == |
||
| − | And finally, begin in [[Odd and even step|even-step]] mode - it's a lot harder and chancier in odd-step. |
||
| + | Blobnet, despite its huge dependence on luck, can also be played with keen logic and intelligent use of chance, a combination without which 436 might have been impossible. The first piece of strategy is to use [[even step]]: [[Fullsec]] is a strong recommendation for MS players, since no runs should be wasted. |
||
| − | But how can you remember all this with the pressure? :) |
||
| + | Many key timesavers require no risk at all. Chip cannot be killed by blobs when collecting chips unless they are next to the chip and Chip takes it on the blob's non-moving turn. There are also frequent situations where Chip can cut across [[floor]] such that, if the blob were not there, time would be saved. The focus of Blobnet's strategy is to collect the chips in such a pattern that the risk of walking across these shortcuts is reduced or eliminated. |
||
| − | Relax...whatever time you're chasing, many of us Chipsters are still chasing it as well. |
||
| + | |||
| + | === Edge chips === |
||
| + | |||
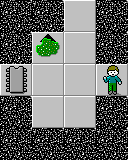
| + | The eight chips on the edges are the most valuable spaces to pick up a lot of time, since the safe route will use an extra four moves. The goal for such areas is a position such as this: |
||
| + | |||
| + | [[File:Blobnet I.png]] |
||
| + | |||
| + | The blob will move on the next turn. Since it is out of striking range, Chip can safely move L with zero risk, and in the unlucky case that the blob moves D, an alternate route can be planned, or Chip can wait [1] and hope to not get hit, in which case the chip is taken. |
||
| + | |||
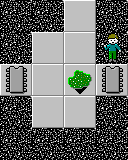
| + | Although these are risk-free, there are some situations where taking a small risk at one point can reduce the overall risk entailed by passing through a specific location. Every other 2 moves, when confined in this 2x3 rectangle, a blob will be either on squares 2, 3 or 6, or 1, 4 or 5. The goal is to reach a 1, 4 or 5 situation, but in the case where the blob is at 4 before the chip is collected, this risky situation results: |
||
| + | |||
| + | [[File:Blobnet II.png]] |
||
| + | |||
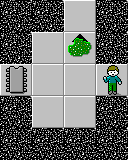
| + | The best move to make in this situation is DL. Although this runs a 1/4 chance of being killed, 2/3 of the time that Chip survives he will also be able to run straight. The greater danger is that the following will occur when the blob is on its non-moving turn: |
||
| + | |||
| + | [[File:Blobnet III.png]] |
||
| + | |||
| + | Although one risk was dodged, to lose no moves a second risk must now be taken, which is greater than the first. If [1] is wasted again, there is a 1/3 chance that the blob will block Chip completely and another 1/3 that it will move L, which poses a ''50:50'' risk. |
||
| + | |||
| + | However, in the case where this occurs on the blob’s moving turn, a [[spring step]] can be used to foresee the blob’s movement on the next turn without losing any time. In advanced situations, it can also be used to determine the route Chip must take slightly sooner so the player can adapt their strategy quicker. |
||
| + | |||
| + | The aim of this and other strategies, plus these same ideas used in other situations such as: |
||
| + | |||
| + | [[File:Blobnet IV.png]] |
||
| + | |||
| + | is to find the balance between waiting and running such that risks are weighed against each other, to get through each sector of the level in such a way that the first two situations are reached most often with the minimum amount of risk, and to know when ''not'' to gamble by determining the most likely situation that will result on the next few chips if the gamble succeeds. |
||
| + | |||
| + | The rest is just nerve and a lot of luck, and despite the extensive strategy outlined here, the use of it is sporadic and depends on many different factors, and is never guaranteed to work all the time. The pressure is the hardest part! |
||
| + | |||
| + | == When to gamble == |
||
| + | |||
| + | * The edge chips are prime spots to gamble on, since they gain the most time and frequently involve little risk. |
||
| + | |||
| + | * Since less time is wasted when Chip dies earlier than later, gamble more freely at the beginning and be more cautious near the end, unless time is running out for your intended time. The most balanced route in the first few seconds is 2L D 3R 2D 5R 3U 2R DU 3R 3D 2R 3D R 2D 3L. |
||
| + | |||
| + | * In the second half of Blobnet, the chips are usually an even number of spaces away from each other, such that little waiting will ever be required. However, when it does happen, watch the next few chips and evaluate whether the risk is greater by waiting or not. |
||
| + | |||
| + | * Take advantage of mere 1/4 chances of death, such as if the blobs threaten chips 2 and 3 here: |
||
| + | |||
| + | [[File:Blobnet V.png]] |
||
| + | |||
| + | * In the second half, some chips can be collected in two orders, like the west and north chips in the following. Watch the closest blobs and take the one that will reduce the risk of being threatened. |
||
| + | |||
| + | [[File:Blobnet VI.png]] |
||
| + | |||
| + | * If the current situation does not call for gambling, consider waiting [1] to sync the blobs back up again. This will depend on how many of the following chips are odd or even moves apart. If the wait threatens more chips than it saves, there is less incentive to play it safe. Also, if waiting will lead to a favorable position such as image I, it is encouraged for the same reason: although it may have been worth the risk to avoid the [1] wait by itself, |
||
| + | |||
| + | == [[Special dispatch]] from [[Melinda]] == |
||
| + | ''Dear Chip, Sorry about all the green blobs. They came from a genetics experiment that didn't quite go right. I walled off this lab quite some time ago, and wouldn't dream of asking you to go in, except that I left 88 chips there. This level requires patience, good timing, patience, and patience. Patiently, Melinda.'' |
||
== Walkthrough == |
== Walkthrough == |
||
| + | [[File:Chip's Challenge 1 level 23 solution - 433 seconds|425px]] |
||
| − | <youtube>xPLy_8N-T-c</youtube> |
||
| + | |||
| − | * This is not a bold route; a 434 route does not exist in video form at this writing. |
||
| + | * This is not a bold route; a 434 route is available at the [[public TWS]]. It was the first confirmation of the 434 record, and it was a 435 route but for an unnecessary, failed spring step, which caused it to fall to 434.8. |
||
| + | * The annotations explain the given strategies by using live examples, and critique how the route worked. |
||
{{Level Progression|Forced Entry|Oorto Geld}} |
{{Level Progression|Forced Entry|Oorto Geld}} |
||
Latest revision as of 18:39, 9 September 2019
| |
| Level set | Chip's Challenge 1 |
|---|---|
| Level number | 23 |
| Password | HUVE |
| Hint | None |
| Chips required | 88 |
| Chips available | 88 |
| Time limit | 500 |
| MS | |
| Bold time | 436 (the Melinda time is calculated to be 444) |
| Difficulty | ***** |
| Bold difficulty | ***** |
| Bold complexity | ***** |
| Lynx | |
| Bold time | 435 |
| Difficulty | ***** |
| Bold difficulty | ***** |
| Bold complexity | ***** |
You can find the page you were looking for at:
https://wiki.bitbusters.club/Blobnet.
This wiki is no longer maintained.
Blobnet is the 23rd level in Chip's Challenge 1, and is on any serious Chipster's list of Most Hated Levels of All Time. The 80 blobs bouncing around randomly within structured squares to collect 88 computer chips among thin tunnels has led to one of the most wrenching, mindless, strategic (or lack of it), and generally outrageous bold time struggles in Chip's Challenge history. Though proper strategy will solve the level easily as long as one can keep a cool head, Blobnet is easily lost, many times over, by impatience or gross errors that would not occur in any other level.
The basic route can be constructed by altering the AVI route to avoid all floor spaces except the chips and eventually the exit. The next step is logic.
Strategy
Blobnet, despite its huge dependence on luck, can also be played with keen logic and intelligent use of chance, a combination without which 436 might have been impossible. The first piece of strategy is to use even step: Fullsec is a strong recommendation for MS players, since no runs should be wasted.
Many key timesavers require no risk at all. Chip cannot be killed by blobs when collecting chips unless they are next to the chip and Chip takes it on the blob's non-moving turn. There are also frequent situations where Chip can cut across floor such that, if the blob were not there, time would be saved. The focus of Blobnet's strategy is to collect the chips in such a pattern that the risk of walking across these shortcuts is reduced or eliminated.
Edge chips
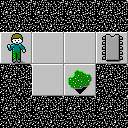
The eight chips on the edges are the most valuable spaces to pick up a lot of time, since the safe route will use an extra four moves. The goal for such areas is a position such as this:
The blob will move on the next turn. Since it is out of striking range, Chip can safely move L with zero risk, and in the unlucky case that the blob moves D, an alternate route can be planned, or Chip can wait [1] and hope to not get hit, in which case the chip is taken.
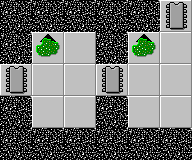
Although these are risk-free, there are some situations where taking a small risk at one point can reduce the overall risk entailed by passing through a specific location. Every other 2 moves, when confined in this 2x3 rectangle, a blob will be either on squares 2, 3 or 6, or 1, 4 or 5. The goal is to reach a 1, 4 or 5 situation, but in the case where the blob is at 4 before the chip is collected, this risky situation results:
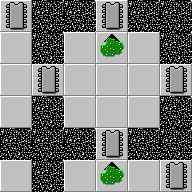
The best move to make in this situation is DL. Although this runs a 1/4 chance of being killed, 2/3 of the time that Chip survives he will also be able to run straight. The greater danger is that the following will occur when the blob is on its non-moving turn:
Although one risk was dodged, to lose no moves a second risk must now be taken, which is greater than the first. If [1] is wasted again, there is a 1/3 chance that the blob will block Chip completely and another 1/3 that it will move L, which poses a 50:50 risk.
However, in the case where this occurs on the blob’s moving turn, a spring step can be used to foresee the blob’s movement on the next turn without losing any time. In advanced situations, it can also be used to determine the route Chip must take slightly sooner so the player can adapt their strategy quicker.
The aim of this and other strategies, plus these same ideas used in other situations such as:
is to find the balance between waiting and running such that risks are weighed against each other, to get through each sector of the level in such a way that the first two situations are reached most often with the minimum amount of risk, and to know when not to gamble by determining the most likely situation that will result on the next few chips if the gamble succeeds.
The rest is just nerve and a lot of luck, and despite the extensive strategy outlined here, the use of it is sporadic and depends on many different factors, and is never guaranteed to work all the time. The pressure is the hardest part!
When to gamble
- The edge chips are prime spots to gamble on, since they gain the most time and frequently involve little risk.
- Since less time is wasted when Chip dies earlier than later, gamble more freely at the beginning and be more cautious near the end, unless time is running out for your intended time. The most balanced route in the first few seconds is 2L D 3R 2D 5R 3U 2R DU 3R 3D 2R 3D R 2D 3L.
- In the second half of Blobnet, the chips are usually an even number of spaces away from each other, such that little waiting will ever be required. However, when it does happen, watch the next few chips and evaluate whether the risk is greater by waiting or not.
- Take advantage of mere 1/4 chances of death, such as if the blobs threaten chips 2 and 3 here:
- In the second half, some chips can be collected in two orders, like the west and north chips in the following. Watch the closest blobs and take the one that will reduce the risk of being threatened.
- If the current situation does not call for gambling, consider waiting [1] to sync the blobs back up again. This will depend on how many of the following chips are odd or even moves apart. If the wait threatens more chips than it saves, there is less incentive to play it safe. Also, if waiting will lead to a favorable position such as image I, it is encouraged for the same reason: although it may have been worth the risk to avoid the [1] wait by itself,
Special dispatch from Melinda
Dear Chip, Sorry about all the green blobs. They came from a genetics experiment that didn't quite go right. I walled off this lab quite some time ago, and wouldn't dream of asking you to go in, except that I left 88 chips there. This level requires patience, good timing, patience, and patience. Patiently, Melinda.
Walkthrough


- This is not a bold route; a 434 route is available at the public TWS. It was the first confirmation of the 434 record, and it was a 435 route but for an unnecessary, failed spring step, which caused it to fall to 434.8.
- The annotations explain the given strategies by using live examples, and critique how the route worked.
You can find the page you were looking for at:
https://wiki.bitbusters.club/Blobnet.
This wiki is no longer maintained.