Octavarium64 (talk | contribs) mNo edit summary |
Mira Laime (talk | contribs) m (vandalismspam) |
||
| (11 intermediate revisions by 5 users not shown) | |||
| Line 1: | Line 1: | ||
| − | {{Infobox Level| |
+ | {{Infobox Level New| |
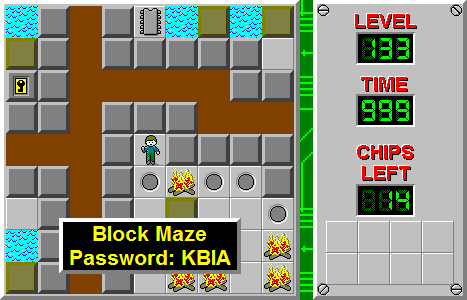
|name = Block Maze |
|name = Block Maze |
||
|image = [[Image:CCLP2 Level 133.png|300px]] |
|image = [[Image:CCLP2 Level 133.png|300px]] |
||
| Line 9: | Line 9: | ||
|chips available = 14 |
|chips available = 14 |
||
|time = 999 |
|time = 999 |
||
| − | |bold = 832 |
+ | |bold ms = 832 |
| − | | |
+ | |bold lynx = 815 |
| + | |||
| + | |difficulty ms = 3 |
||
| + | |bold difficulty ms = 3 |
||
| + | |bold complexity ms = 4 |
||
| + | |||
| + | |difficulty lynx = 3 |
||
| + | |bold difficulty lynx = 4 |
||
| + | |bold complexity lynx = 4 |
||
}} |
}} |
||
| − | '''Block Maze''' is the 133rd level in [[Chip's Challenge Level Pack 2]]. Largely, this level is described by its title, although Tyrethali Ansrath uses his trademark style in several different areas of |
+ | '''Block Maze''' is the 133rd level in [[Chip's Challenge Level Pack 2]]. Largely, this level is described by its title, although [[Tyrethali Ansrath]] uses his trademark style in several different areas of [[block]]s. |
| + | |||
| ⚫ | Start by coming out through the center, then move east through the [[dirt]] until near the next patch of [[gravel]]. Approach the entrance to the [[bug]] room from the low side (UR rather than 2R) to restrict the domain of the bugs, and then 2R U, collect the twelve [[yellow key]]s, and then drop to the [[pink ball]] area and collect these three chips on the left, then 2R and take the others. Open the first [[yellow lock]] and now begin to shift the 9 blocks: 2D 2L 4D 3:RD, use these two blocks and block 4, then move block 6 D and use blocks 8 and 1, which will change the paramecia order to allow Chip to avoid them completely. Now, drop block 3 D and use blocks 5, 2, 6 and 3 to reach the [[blue key]]. |
||
| + | |||
| ⚫ | Turn to the left, then north, and move onto the gravel, then 3L over the dirt to the west, and then back to the pathway in the center. Remove the two locks, then LD and take the [[red key]], and now remove the yellow and [[red lock]]s to free the three blocks. Move block 3 out and 5U 7D, then collect block 1 and use block 3 on the [[water]] path to the top. Repeat this movement to reach the chips in this area, and at some point turn downwards onto a hidden [[ice]] and play through the [[bomb]]s to open the [[toggle wall]]s. When this area is finally done, move to the extreme west and take the first chip, through the [[blue lock]] and 2U, with chips on both sides, and then to the last room on the right, which leads to the final chip. Now, play to the right and into the last yellow lock, and U 2:[2R 2U 2L 2U] (2R 2U) through the [[socket]] to the [[green key]]. Finish in a similar manner, with LULULDLU 2L. |
||
| + | == Fix for Lynx == |
||
| ⚫ | Start by coming out through the center, then move east through the dirt until near the next patch of gravel. Approach from the |
||
| + | Block Maze's only violation of Lynx rules is the [[gravel]] under the yellow lock guarding the [[exit]] section. This is not truly necessary since Chip will be heading to the exit, and only on rare occasions will a bug enter the room and disrupt the (2R 2U) move. To fix this, move the buried gravel from the lock on [27, 13] up to the block at [27, 12]: blocks can legally hide gravel underneath. |
||
| ⚫ | Turn to the left, then north, and move onto the gravel, then 3L over the dirt to the west, and then back to the pathway in the center. Remove the two |
||
== Walkthrough == |
== Walkthrough == |
||
| + | [[File:CCLP2 level 133 solution - 832 seconds|425px]] |
||
| − | <youtube>T3wuoVGxO_A</youtube> |
||
{{Level Progression|Captured|Microcosm}} |
{{Level Progression|Captured|Microcosm}} |
||
| + | [[Category:Levels unplayable in Lynx]] |
||
Latest revision as of 18:39, 9 September 2019
| |
| Level set | Chip's Challenge Level Pack 2 |
|---|---|
| Level number | 133 |
| Password | KBIA |
| Hint | None |
| Chips required | 14 |
| Chips available | 14 |
| Time limit | 999 |
| MS | |
| Bold time | 832 |
| Difficulty | ***** |
| Bold difficulty | ***** |
| Bold complexity | ***** |
| Lynx | |
| Bold time | 815 |
| Difficulty | ***** |
| Bold difficulty | ***** |
| Bold complexity | ***** |
You can find the page you were looking for at:
https://wiki.bitbusters.club/Block_Maze.
This wiki is no longer maintained.
Block Maze is the 133rd level in Chip's Challenge Level Pack 2. Largely, this level is described by its title, although Tyrethali Ansrath uses his trademark style in several different areas of blocks.
Start by coming out through the center, then move east through the dirt until near the next patch of gravel. Approach the entrance to the bug room from the low side (UR rather than 2R) to restrict the domain of the bugs, and then 2R U, collect the twelve yellow keys, and then drop to the pink ball area and collect these three chips on the left, then 2R and take the others. Open the first yellow lock and now begin to shift the 9 blocks: 2D 2L 4D 3:RD, use these two blocks and block 4, then move block 6 D and use blocks 8 and 1, which will change the paramecia order to allow Chip to avoid them completely. Now, drop block 3 D and use blocks 5, 2, 6 and 3 to reach the blue key.
Turn to the left, then north, and move onto the gravel, then 3L over the dirt to the west, and then back to the pathway in the center. Remove the two locks, then LD and take the red key, and now remove the yellow and red locks to free the three blocks. Move block 3 out and 5U 7D, then collect block 1 and use block 3 on the water path to the top. Repeat this movement to reach the chips in this area, and at some point turn downwards onto a hidden ice and play through the bombs to open the toggle walls. When this area is finally done, move to the extreme west and take the first chip, through the blue lock and 2U, with chips on both sides, and then to the last room on the right, which leads to the final chip. Now, play to the right and into the last yellow lock, and U 2:[2R 2U 2L 2U] (2R 2U) through the socket to the green key. Finish in a similar manner, with LULULDLU 2L.
Fix for Lynx
Block Maze's only violation of Lynx rules is the gravel under the yellow lock guarding the exit section. This is not truly necessary since Chip will be heading to the exit, and only on rare occasions will a bug enter the room and disrupt the (2R 2U) move. To fix this, move the buried gravel from the lock on [27, 13] up to the block at [27, 12]: blocks can legally hide gravel underneath.
Walkthrough

You can find the page you were looking for at:
https://wiki.bitbusters.club/Block_Maze.
This wiki is no longer maintained.