No edit summary |
Mira Laime (talk | contribs) m (vandalismspam) |
||
| (12 intermediate revisions by 7 users not shown) | |||
| Line 1: | Line 1: | ||
| − | {{Infobox Level| |
+ | {{Infobox Level New| |
|name = Chip's Fight |
|name = Chip's Fight |
||
|image = [[Image:CCLP2 Level 102.png|300px]] |
|image = [[Image:CCLP2 Level 102.png|300px]] |
||
| Line 9: | Line 9: | ||
|chips available = 3 |
|chips available = 3 |
||
|time = 450 |
|time = 450 |
||
| − | |bold = 371 |
+ | |bold ms = 371 |
| − | | |
+ | |bold lynx = 362 |
| + | |||
| + | |difficulty ms = 3 |
||
| + | |bold difficulty ms = 3 |
||
| + | |bold complexity ms = 3 |
||
| + | |||
| + | |difficulty lynx = 3 |
||
| + | |bold difficulty lynx = 2 |
||
| + | |bold complexity lynx = 3 |
||
}} |
}} |
||
| − | '''Chip's Fight''' is the 102nd level in [[Chip's Challenge Level Pack 2]]. As indicated, Chip's Fight is a challenging struggle, but always manages to stay away from being annoying, and is one of Christian Ståhl's classics. |
+ | '''Chip's Fight''' is the 102nd level in [[Chip's Challenge Level Pack 2]]. As indicated, Chip's Fight is a challenging struggle, but always manages to stay away from being annoying, and is one of [[Christian Ståhl|Christian Ståhl's]] classics. |
| − | Start with D, as L leads to a [[bomb]] and R to [[fire]], and U is blocked. This gives |
+ | Start with D, as L leads to a [[bomb]] and R to [[fire]], and U is blocked. This gives [[Chip]] [[fire boots]]; Chip can now go back U and push R to remove another bomb. Continue to push UL to take the [[green key]]; this will release four [[fireball]]s, with the accompanying disadvantages, but it's forced and they do remove two more bombs for Chip. Now, open the [[green lock]] and move the block on the right R, then step U and catch it coming down by waiting [1/2]. This allows Chip to bridge to an [[ice]] section; after the long slide, leap (DRDLDR 2D) to reach the [[blue key]], then return back out to the start. When heading towards the [[blue lock]], shove both blocks 7 and 6 L. This will catch and trap the remaining fireballs in the corridor underneath such that they do not bother Chip later, without affecting the [[Slide Delay]]. |
| − | + | Pass the three [[bug]]s and touch both [[red button]]s; since you need a block to remove the bomb in the way below, wait [1/2] before sliding to catch the second cloned block. Move the block 3L further, circle underneath it to remove the [[blue wall]]s, and then knock out the bomb and take the [[yellow key]]. Continue to the teleport and move (>R R 3D) to collect one chip, then return back down the path to the east, pick up one more chip, and then drop to the very southeast ball section, calling on [[Creative One-Ways]]. Take the final chip, then wait [3] (a move was lost in the [[AVI]], so only [2] is spent there) and push the block 2L to allow Chip to escape. Now, move back to the center and shove block 1 out of the way, then open the [[yellow lock]], walk across the bottom edge and then across column 0 to the exit. |
|
== Trivia == |
== Trivia == |
||
| − | * In the original level set by Christian Ståhl, the level was named |
+ | * In the original level set by Christian Ståhl, the level was named "[[Chipsters]] fight". |
== Walkthrough == |
== Walkthrough == |
||
| + | [[File:CCLP2 level 102 solution - 371 seconds|425px]] |
||
| − | <youtube>R26h-BYDc5I</youtube> |
||
{{Level Progression|Hard as Rock|Island Hopping}} |
{{Level Progression|Hard as Rock|Island Hopping}} |
||
Latest revision as of 18:40, 9 September 2019
| |
| Level set | Chip's Challenge Level Pack 2 |
|---|---|
| Level number | 102 |
| Password | UYXS |
| Hint | None |
| Chips required | 3 |
| Chips available | 3 |
| Time limit | 450 |
| MS | |
| Bold time | 371 |
| Difficulty | ***** |
| Bold difficulty | ***** |
| Bold complexity | ***** |
| Lynx | |
| Bold time | 362 |
| Difficulty | ***** |
| Bold difficulty | ***** |
| Bold complexity | ***** |
You can find the page you were looking for at:
https://wiki.bitbusters.club/Chip%27s_Fight.
This wiki is no longer maintained.
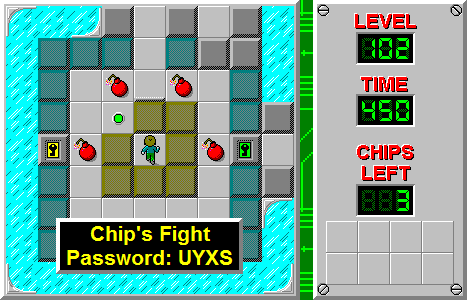
Chip's Fight is the 102nd level in Chip's Challenge Level Pack 2. As indicated, Chip's Fight is a challenging struggle, but always manages to stay away from being annoying, and is one of Christian Ståhl's classics.
Start with D, as L leads to a bomb and R to fire, and U is blocked. This gives Chip fire boots; Chip can now go back U and push R to remove another bomb. Continue to push UL to take the green key; this will release four fireballs, with the accompanying disadvantages, but it's forced and they do remove two more bombs for Chip. Now, open the green lock and move the block on the right R, then step U and catch it coming down by waiting [1/2]. This allows Chip to bridge to an ice section; after the long slide, leap (DRDLDR 2D) to reach the blue key, then return back out to the start. When heading towards the blue lock, shove both blocks 7 and 6 L. This will catch and trap the remaining fireballs in the corridor underneath such that they do not bother Chip later, without affecting the Slide Delay.
Pass the three bugs and touch both red buttons; since you need a block to remove the bomb in the way below, wait [1/2] before sliding to catch the second cloned block. Move the block 3L further, circle underneath it to remove the blue walls, and then knock out the bomb and take the yellow key. Continue to the teleport and move (>R R 3D) to collect one chip, then return back down the path to the east, pick up one more chip, and then drop to the very southeast ball section, calling on Creative One-Ways. Take the final chip, then wait [3] (a move was lost in the AVI, so only [2] is spent there) and push the block 2L to allow Chip to escape. Now, move back to the center and shove block 1 out of the way, then open the yellow lock, walk across the bottom edge and then across column 0 to the exit.
Trivia
- In the original level set by Christian Ståhl, the level was named "Chipsters fight".
Walkthrough

You can find the page you were looking for at:
https://wiki.bitbusters.club/Chip%27s_Fight.
This wiki is no longer maintained.